Loading viewer...
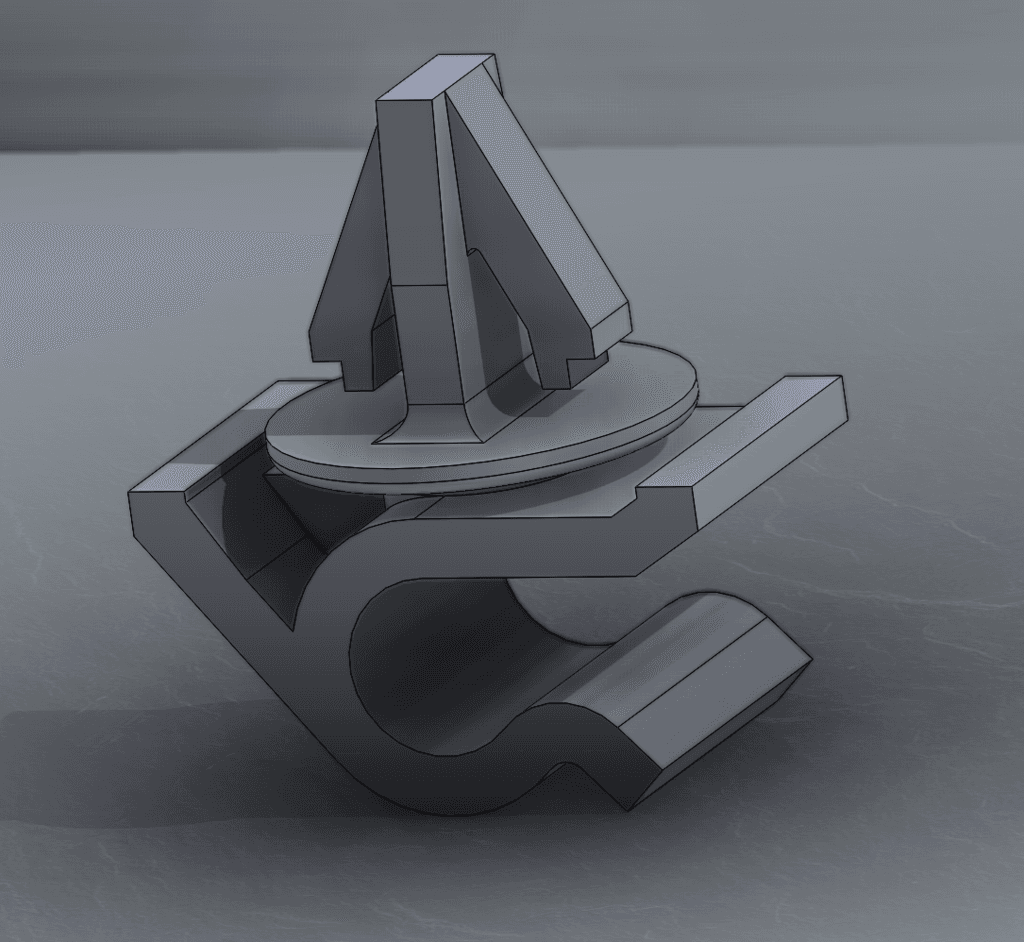
Tronxy P802e Inductive/Capacitive Sensor Mount
Mounting Bracket to Hold a LJC18A3-B-Z/BX Sensor Suited to the Hotend Bracket of a Tronxy P802e from Aliexpress *Update* I have my probe working with Repetier Firmware and i thought i would post some notes given how little information there is on the Web. LJC18A3-B-Z/BX Sensor Wiring The Brown wire is +, Blue Wire is - and Black wire is Signal. If using a Melzi board (like I am). I connect Brown to the 12V PSU +, Blue to PSU - and the Black Signal to the Z min endstop signal. Repetier Firmware I use Repetier firmware, please dont ask questions about Marlin as i have no idea. Use the online tool https://www.repetier.com/firmware/v092/ to make changes to your firmware. Make sure ALWAYS_CHECK_ENDSTOPS is set to false. This in on the Mechanics Tab. On the Features Tab, enable Z-Probing and also set the method of Auto Bed leveling you want to use. I use n*n grid and set the grid to 4 (16 Z probe points). Leave the rest as default as you can set the Probe height, offsets and probe points in the eeprom. I have my probe set to trigger when the nozzle is roughly 2mm above the print bed, so i have set my Probe height to 2mm. To get the Z Probe value and you have a Z min end stop. Move the Nozzle so that the sensor is off your print bed and home Z so that it is just touching your print bed (manual calibration). Slowly move your nozzle so that the sensor is over the bed with the nozzle still touching the bed. Now move Z up 10mm and then send a G30 command to your printer. This is will return the value Z moved down when the probe was triggered, for example 8.23mm. Now subtract that value from 10mm. in my example 10- 8.23 would be 1.77mm. To be safe, set your Z probe Height in eeprom as 1.75 which gives 0.02mm clearance. My Start G-Code is as follows. G28 X0 Y0 ;Home X and Y G1 Z10 F{Z_TRAVEL_SPEED} ;Move Z UP 10mm G1 X150 Y150 F{TRAVEL_SPEED} ;Move X and Y to the centre of your print bed. G28 Z0 ;Home Z (when the probe triggers it will then mo